
How to Enable Hibernate in Ubuntu 14.04

http://ubuntuhandbook.org/index.php/2014/04/enable-hibernate-ubuntu-14-04/

This simple and brief tutorial is going to show you how to enable the hibernate feature in Ubuntu 14.04 Trusty Tahr.

Hibernate is disabled by default in Ubuntu, when the computer hibernates, all of your applications and documents are stored and the computer completely switches off so it does not use any power, but the applications and documents will still be open when you switch on the computer again.

Test if hibernate works in your case:

Before getting started, press Ctrl+ALt+T on your keyboard to open the terminal. When it opens, run:

sudo pm-hibernate

After you computer turns off, switch it back on. Did your open applications re-open? If hibernate doesn’t work, check if your swap partition is at least as large as your available RAM.

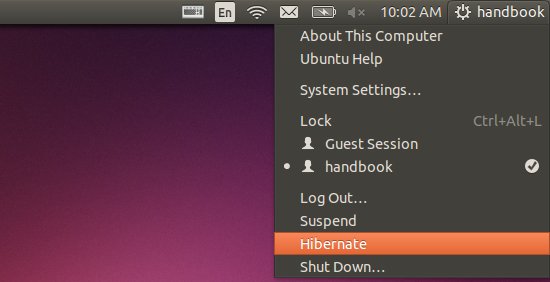
Enable Hibernate in System Tray Menu:

The indicator-session was updated to use logind instead of upower. Hibernate is disabled by default in both upower and logind.

To re-enable hibernate, run the commands below one by one to edit the config file:

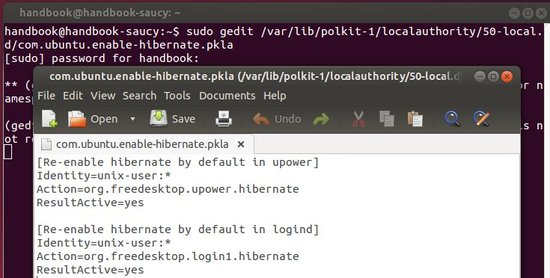
sudo -i    cd /var/lib/polkit-1/localauthority/50-local.d/    gedit com.ubuntu.enable-hibernate.pkla

Tips: if the config file does not work for you, try another one by changing /var/lib to /etc in the code.

Copy and paste below lines into the file and save it.

[Re-enable hibernate by default in upower]
Identity=unix-user:*
Action=org.freedesktop.upower.hibernate
ResultActive=yes

[Re-enable hibernate by default in logind]
Identity=unix-user:*
Action=org.freedesktop.login1.hibernate
ResultActive=yes

Restart your computer and done.

Hibernate your laptop when lid is closed:

1.Edit “/etc/systemd/logind.conf” via command:

sudo gedit /etc/systemd/logind.conf

2. Change the line #HandleLidSwitch=suspend to HandleLidSwitch=hibernate and save the file.

3. Run command below or just restart your computer to apply changes:

sudo restart systemd-logind

That’s it. Enjoy!


Comments

Popular posts from this blog

The Difference Between LEGO MINDSTORMS EV3 Home Edition (#31313) and LEGO MINDSTORMS Education EV3 (#45544)

http://robotsquare.com/2013/11/25/difference-between-ev3-home-edition-and-education-ev3/ This article covers the difference between the LEGO MINDSTORMS EV3 Home Edition and LEGO MINDSTORMS Education EV3 products. Other articles in the ‘difference between’ series: * The difference and compatibility between EV3 and NXT ( link ) * The difference between NXT Home Edition and NXT Education products ( link ) One robotics platform, two targets The LEGO MINDSTORMS EV3 robotics platform has been developed for two different target audiences. We have home users (children and hobbyists) and educational users (students and teachers). LEGO has designed a base set for each group, as well as several add on sets. There isn’t a clear line between home users and educational users, though. It’s fine to use the Education set at home, and it’s fine to use the Home Edition set at school. This article aims to clarify the differences between the two product lines so you can decide which

Let’s ban PowerPoint in lectures – it makes students more stupid and professors more boring

https://theconversation.com/lets-ban-powerpoint-in-lectures-it-makes-students-more-stupid-and-professors-more-boring-36183 Reading bullet points off a screen doesn't teach anyone anything. Author Bent Meier Sørensen Professor in Philosophy and Business at Copenhagen Business School Disclosure Statement Bent Meier Sørensen does not work for, consult to, own shares in or receive funding from any company or organisation that would benefit from this article, and has no relevant affiliations. The Conversation is funded by CSIRO, Melbourne, Monash, RMIT, UTS, UWA, ACU, ANU, ASB, Baker IDI, Canberra, CDU, Curtin, Deakin, ECU, Flinders, Griffith, the Harry Perkins Institute, JCU, La Trobe, Massey, Murdoch, Newcastle, UQ, QUT, SAHMRI, Swinburne, Sydney, UNDA, UNE, UniSA, UNSW, USC, USQ, UTAS, UWS, VU and Wollongong.

Building a portable GSM BTS using the Nuand bladeRF, Raspberry Pi and YateBTS (The Definitive and Step by Step Guide)

https://blog.strcpy.info/2016/04/21/building-a-portable-gsm-bts-using-bladerf-raspberry-and-yatebts-the-definitive-guide/ Building a portable GSM BTS using the Nuand bladeRF, Raspberry Pi and YateBTS (The Definitive and Step by Step Guide) I was always amazed when I read articles published by some hackers related to GSM technology. H owever , playing with GSM technologies was not cheap until the arrival of Software Defined Radios (SDRs), besides not being something easy to be implemented. A fter reading various articles related to GSM BTS, I noticed that there were a lot of inconsistent and or incomplete information related to the topic. From this, I decided to write this article, detailing and describing step by step the building process of a portable and operational GSM BTS. Before starting with the “hands on”, I would like to thank all the pioneering Hackers and Researchers who started the studies related to previously closed GSM technology. In particul