Controller DEI 617D
sumber: https://hvactutorial.files.wordpress.com/2011/08/617s-617d.pdf

perangkat yang mirip:
Front Panel Operating
1.Power ON/OFF button :
Press button and hold for 3 seconds to star-tup the controller based on the preset operating mode
a parameters. Press it again for 3 seconds to turn off the system.
2.
nd
Light ON/OFF button :
Press button and hold for 3 seconds to turn on or off the the illuminating equipment. In model DEI-
617D, it serves to switch between upper & lower lights on or off.
3.Defog ON/OFF button :
Press button and hold for 3 seconds to turn on or off the defog heater.
4.Manual/Stop defrost :
Press both & buttons and hold for 3 seconds to enter defrost process which will be
terminated automatically when the p g again both & buttons.
5.Lock/unlock panel parameters :
In normal operating, press both Light and Defog buttons for 3 seconds to lock the parameters
("00" is displayed) or to unlock ("33" is displayed).
6.User`s parameter setup :
A.Press Func. button for 3 seconds to enter the User s Parameter Setup Mode, and the Set
Temp. LED is on.
B.Press the Func. button again to select sequentially from the 4 functions a/f : Set Temp., Set temp.
threshold, Operation duty and Defrost time.
C.When the required function is selected, use or button to adjust the value.
D.If no more button is pressed within 10 seconds, the system will save the new value and then exit to
normal operation.
7.Internal parameter setup :
A.Stop the power. Press Func. button followed by re-plug in to enter the Internal Parameter Setup
Mode. both Light and Defog LEDs flash and Set. Temp. LED is on.
B.Press Func. Button to select sequentially from the 3 functions a/f : Set min. temp. (Set Temp.
LED on), Temp. sensor calibration ( temp. LED on), Compressor start delay time (Operation LED
on)
C.When the required function is selected, press or button to adjust the value.
D.Press both Light and Defog buttons to load in the factory default.
E.Press Power button to save the new parameter and exit to the normal operation.
8.Error codes :
"EE" : Parameter memory failure (Re-plug in and operate as factory default)
"E0" : Calibrating sensor failure (Return to the factory for repairing)
"E1" : Probe failure (Check if the sensor is well connected or change the sensor)
reset defrost time is up or by pressin
M icom C ontroller
Power ON/OFF button
Setting temperature LED
Temperature threshold LED
Defrost time LED
Operation duty LED
Temperature / time decrease button Numerical display
Temperature / time increase button
Light ON / OFF button
Defog ON / OFF button
Function select button
Light LED
Defog LED
617S/617D OPERATION MANUAL
Research/Developed Manufactured by a ISO-9001 Certificated company.
-Version 03-
Specification :
1.Temp. display range : -45 ~ +45 Tolerance +/- 1
2.Temp. sensor : NTC. PVC or silicon. 1.5m (L)
3.Parameter setup:
A.User s parameters :
a.Set temperature : Min. Set~ 40 Factory default 5 (DEI-617) or -18 (DEI-817).
b.Set temp. threshold : 2K~10K (+/- 1 ~+/- 5 ) Factory default 4K (+/-2 ).
c.Operation duty : 0~99 hours. Factory default 4 hours.
d.Defrost time : 0~60 minutes. Factory default 25 minutes.
B.Internal parameters:
a.Min. set temperature:-40 ~10 . Factory default 0 (DEI-617)or-30 (DEI-817).
b.Temp. calibration:-8 ~7 . Factory default 0 .
c.Compressor delay protection:0~15 minutes. Factory default 3 minutes(*1)
C.Factory default (unable to change):
In case of temperature sensor failure, the compressor will operate for 15
minutes and stop for 15 minutes automatically.
4.Compressor operation:The compressor starts operating when room temperature (set temp.+1/2
threshold), and will be off when room temperature ( set temp. +1/2 threshold) or in defrosting process.
5.Defrost mode and fan operation :
a.Defrost is performed by the preset defrost time or When defrost in
progress, Defr. LED flashes, compressor is off, and fan runs continuously.
b.After defrost, fan starts (*2) and compressor operates according to the difference between room temp,
setting temp. and temp. Threshold.
B.Elec. heater defrost (DEI-817)
a.Defrost is performed by the preset operation duty or forced manually. When defrost in progress, the
Defr. LED flashes, compressor is off, and heater turns on and fan stops.
b.After defrost, fan starts with 2 minutes delay (*2) and compressor with 1 minute delay, operates
according to the difference between room temp., setting temp. and temp. threshold.
6.Output contact capacity:
A.Compressor contact : N.O. contact 25A/250VA (*3)
B.Fan, Light, Defog, Heater contact : 7A/250VAC
7.Power requirement : AC220V/110V +/- 10% single phase 50/60 Hz, 10 Watts (Controller only)
8.Storage : -10~+70 , RH20%~80% (none-condensing)
9.Operating : -15~+60 , RH20%~90% (none-condensing)
*1. Even parameter value as 0 minute, the compressor still starts with 1 minute delay after re-plug in
*2. Fan's ON or OFF subject to continuous operating.(internal option)
*3. Compressor with 30A N.O contact plus 10A N.C contact is available..
A.Compressor-off defrost (DEI-617).
operating manually.
® w ¤· ºP ·¾ Ź
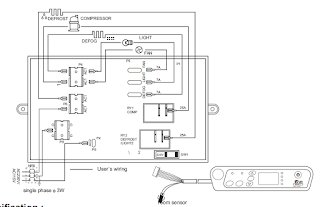
room sensor
User`s wiring
DEFOG LIGHT FAN
P4
P5
RY2
DEFROST
/LIGHT2
LIGHT
DEFOG
DEFROST COMPRESSOR
FAN
7A
P1
7A
7A
25A
25A
AC1 AC1 AC1
P6
G G
G G
P8
P9
AC1
AC2
° £ Á¹ ÷q ¼¾ ö¹ À £ Á¾ Y÷
° £ ù úq ¼¾ ö¹
· Ó © ú
· ® °
± μ¦ a½ u
· ® °
· Ó © ú
° £ Ã ú
RY1
COMP
À £ Á¾ Y÷
° £ Á\·÷Ó ©2ú
¹ q· ½2
¹ q· ½1
NFB
single phase 3W
230V SW1
~~
¶}
° £ Ã ú · Ó © ú
¶ } · Å « × ³ ] © w
· Å ® t ³ ] © w
¹ B Â à ¶ g ´ Á
° £ Ã ú ® É ¶ ¡
AC230V/
AC115V
sumber: https://hvactutorial.files.wordpress.com/2011/08/617s-617d.pdf


perangkat yang mirip:
- http://www.dei.com.tw/cool_single_e.html
- http://www.ehardware2u.com/index.php?route=product/product&product_id=1766
- https://hvactutorial.files.wordpress.com/2011/08/dei-617se-617de-817e.pdf
- https://hvactutorial.files.wordpress.com/2011/08/dei-815e.pdf
- https://hvactutorial.wordpress.com/instruction-manual/dei/
- http://www.temco.bg/p/01_electron/spec_en/DEI-615/615.pdf
- https://hvactutorial.files.wordpress.com/2011/08/617s-617d.pdf
Front Panel Operating
1.Power ON/OFF button :
Press button and hold for 3 seconds to star-tup the controller based on the preset operating mode
a parameters. Press it again for 3 seconds to turn off the system.
2.
nd
Light ON/OFF button :
Press button and hold for 3 seconds to turn on or off the the illuminating equipment. In model DEI-
617D, it serves to switch between upper & lower lights on or off.
3.Defog ON/OFF button :
Press button and hold for 3 seconds to turn on or off the defog heater.
4.Manual/Stop defrost :
Press both & buttons and hold for 3 seconds to enter defrost process which will be
terminated automatically when the p g again both & buttons.
5.Lock/unlock panel parameters :
In normal operating, press both Light and Defog buttons for 3 seconds to lock the parameters
("00" is displayed) or to unlock ("33" is displayed).
6.User`s parameter setup :
A.Press Func. button for 3 seconds to enter the User s Parameter Setup Mode, and the Set
Temp. LED is on.
B.Press the Func. button again to select sequentially from the 4 functions a/f : Set Temp., Set temp.
threshold, Operation duty and Defrost time.
C.When the required function is selected, use or button to adjust the value.
D.If no more button is pressed within 10 seconds, the system will save the new value and then exit to
normal operation.
7.Internal parameter setup :
A.Stop the power. Press Func. button followed by re-plug in to enter the Internal Parameter Setup
Mode. both Light and Defog LEDs flash and Set. Temp. LED is on.
B.Press Func. Button to select sequentially from the 3 functions a/f : Set min. temp. (Set Temp.
LED on), Temp. sensor calibration ( temp. LED on), Compressor start delay time (Operation LED
on)
C.When the required function is selected, press or button to adjust the value.
D.Press both Light and Defog buttons to load in the factory default.
E.Press Power button to save the new parameter and exit to the normal operation.
8.Error codes :
"EE" : Parameter memory failure (Re-plug in and operate as factory default)
"E0" : Calibrating sensor failure (Return to the factory for repairing)
"E1" : Probe failure (Check if the sensor is well connected or change the sensor)
reset defrost time is up or by pressin
M icom C ontroller
Power ON/OFF button
Setting temperature LED
Temperature threshold LED
Defrost time LED
Operation duty LED
Temperature / time decrease button Numerical display
Temperature / time increase button
Light ON / OFF button
Defog ON / OFF button
Function select button
Light LED
Defog LED
617S/617D OPERATION MANUAL
Research/Developed Manufactured by a ISO-9001 Certificated company.
-Version 03-
Specification :
1.Temp. display range : -45 ~ +45 Tolerance +/- 1
2.Temp. sensor : NTC. PVC or silicon. 1.5m (L)
3.Parameter setup:
A.User s parameters :
a.Set temperature : Min. Set~ 40 Factory default 5 (DEI-617) or -18 (DEI-817).
b.Set temp. threshold : 2K~10K (+/- 1 ~+/- 5 ) Factory default 4K (+/-2 ).
c.Operation duty : 0~99 hours. Factory default 4 hours.
d.Defrost time : 0~60 minutes. Factory default 25 minutes.
B.Internal parameters:
a.Min. set temperature:-40 ~10 . Factory default 0 (DEI-617)or-30 (DEI-817).
b.Temp. calibration:-8 ~7 . Factory default 0 .
c.Compressor delay protection:0~15 minutes. Factory default 3 minutes(*1)
C.Factory default (unable to change):
In case of temperature sensor failure, the compressor will operate for 15
minutes and stop for 15 minutes automatically.
4.Compressor operation:The compressor starts operating when room temperature (set temp.+1/2
threshold), and will be off when room temperature ( set temp. +1/2 threshold) or in defrosting process.
5.Defrost mode and fan operation :
a.Defrost is performed by the preset defrost time or When defrost in
progress, Defr. LED flashes, compressor is off, and fan runs continuously.
b.After defrost, fan starts (*2) and compressor operates according to the difference between room temp,
setting temp. and temp. Threshold.
B.Elec. heater defrost (DEI-817)
a.Defrost is performed by the preset operation duty or forced manually. When defrost in progress, the
Defr. LED flashes, compressor is off, and heater turns on and fan stops.
b.After defrost, fan starts with 2 minutes delay (*2) and compressor with 1 minute delay, operates
according to the difference between room temp., setting temp. and temp. threshold.
6.Output contact capacity:
A.Compressor contact : N.O. contact 25A/250VA (*3)
B.Fan, Light, Defog, Heater contact : 7A/250VAC
7.Power requirement : AC220V/110V +/- 10% single phase 50/60 Hz, 10 Watts (Controller only)
8.Storage : -10~+70 , RH20%~80% (none-condensing)
9.Operating : -15~+60 , RH20%~90% (none-condensing)
*1. Even parameter value as 0 minute, the compressor still starts with 1 minute delay after re-plug in
*2. Fan's ON or OFF subject to continuous operating.(internal option)
*3. Compressor with 30A N.O contact plus 10A N.C contact is available..
A.Compressor-off defrost (DEI-617).
operating manually.
® w ¤· ºP ·¾ Ź
room sensor
User`s wiring
DEFOG LIGHT FAN
P4
P5
RY2
DEFROST
/LIGHT2
LIGHT
DEFOG
DEFROST COMPRESSOR
FAN
7A
P1
7A
7A
25A
25A
AC1 AC1 AC1
P6
G G
G G
P8
P9
AC1
AC2
° £ Á¹ ÷q ¼¾ ö¹ À £ Á¾ Y÷
° £ ù úq ¼¾ ö¹
· Ó © ú
· ® °
± μ¦ a½ u
· ® °
· Ó © ú
° £ Ã ú
RY1
COMP
À £ Á¾ Y÷
° £ Á\·÷Ó ©2ú
¹ q· ½2
¹ q· ½1
NFB
single phase 3W
230V SW1
~~
¶}
° £ Ã ú · Ó © ú
¶ } · Å « × ³ ] © w
· Å ® t ³ ] © w
¹ B Â à ¶ g ´ Á
° £ Ã ú ® É ¶ ¡
AC230V/
AC115V
Comments
Post a Comment